Saturday, November 21, 2015

DIY Photo Frame using Cardboard

Isn't exciting to make our own photo frame!! Yeyy.. :) We're going to make one now. It's very simple to make along with kids also.


Supplies needed
  • Cardboard
  • Handmade paper/craft paper
  • Glue
  • Scissors/ Detail Knife
  • Marker
That's all. Aren't the supplies necessary so minimal.!!


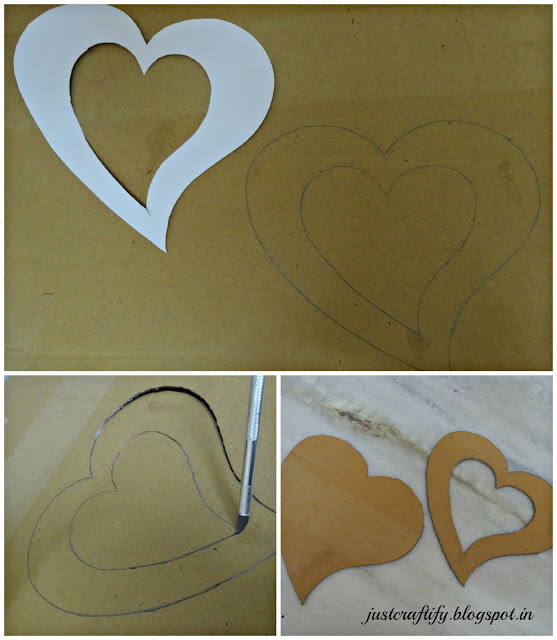
Let's start with the process. First trace out heart shape or any shape you wish to make on a sheet of paper. Using scissors cut along the traced shape to use it as a template.


Using this template, trace inner and outer part of template on cardboard and cut along traced shape for front part. For back part of photo frame, trace outer part of template on cardboard and cut along traced path using sharp knife.


Using the same template, trace inner and outer part of template on handmade paper or craft paper and cut little above traced shape to stick on and along sides of cardboard cut for the front part as below.


Now, trace and cut an arc on cardboard. Stick this arc on back portion of photo frame as below for forming a gap to insert photo.


Stick front portion of photo frame we made on to arc that is attached to back portion of photo frame.
Now, cut two small rectangular pieces of cardboard to form stand for the frame as below.


Yuhoo.!! Beautiful photo frame is ready (:D)


Thank you for stopping by.

Tuesday, November 10, 2015

Minion box upcycled with cardboard tube

Minion lovers!! Here is a DIY for you, Minion box up-cycled with cardboard tube.


Below are supplies needed
  • Cardboard tube
  • Foam sheets (blue, yellow, black, grey, white colors)
  • Sharp knife/ scissors
  • Glue gun
  • Scale
  • Marker
  • Scale/ruler
  • Blue sketch/marker
First take the cardboard tube and mark a line at 10 cm along the circumference of the tube for bottom of the minion box. Mark another line at 3.5cm for the top of the minion box. Cut along the marked lines with the help of sharp knife. Later cover the cut pieces of tube with plain white paper to hide the writings on cardboard tube. 

Now take the yellow foam sheet and cut it along at the length of 9cm (1cm less than length of bottom of minion box). Wrap it along circumference of cardboard tube cut for bottom part and stick both ends as shown in the picture above. Similarly, cut one more yellow foam sheet of length 4.5cm (1cm more than length of top of minion box) for top of minion box and wrap it along its circumference and stick both ends.


To cover top cardboard tube, apply glue using glue gun along circumference of top and place it upside down on yellow foam sheet and cut along circumference of it. Similarly, cover bottom of cardboard tube also.  This is how it looks after sticking yellow foam sheet.


Now let's make below accessories for the minion.


Let's start with Jeans. Yoo!! Jeans for minion. Take blue foam sheet and cut as shown in below shape of total height 8.5cm, bottom part height 4cm, top part height 1.5cm. Leave a gap of 4cm in between to stick button. Mark small lines along border of jeans with blue marker to give the effect of stitching. Cut semi circle of radius 1cm to stick it at middle of jeans as button.


Stick this jeans along circumference as above. Yoo!! Bottom part of minion is ready.!!

Let's make the spectacles now. For frame of the spectacles take grey foam sheet and trace two concentric circles, one bigger circle of diameter 6cm, other smaller one of diameter 4cm  and cut along traced circles. Trace and cut long black foam sheet of width 0.8cm and length necessary to circumference minion box.

For eye of  minion trace and cut a circle of radius 2cm on white foam sheet. Cut and trace one other circle of radius 1cm on black foam sheet for eye ball. Stick spectacles frame (circle of grey foam sheet) and eye ball (circle of black foam sheet) on circle of white foam sheet. And stick this along with black foam sheet as shown in above picture on top part of minion.

That's it... Minion box is ready.!! Isn't it cool?? I gifted it to my friends and they loved it. :)


Instead of two piece minion, you can make it one single piece and leave the top open to use it as pencil stand.

Thank you for dropping by.

Saturday, November 7, 2015

Pistachio Shells Candle Votive


Are you a pistachio lover?? Yoo.!! Thumbs up.. Here is a perfect DIY for you. Moreover, this is ideal for the upcoming festive season and the best part is its very simple to make. All you need to do is store pistachio shells whenever you have it.

Let's start with the supplies needed.
  •  Pistachio shells
  •  Fevicryl Pearl metallic gold color
  •  Thick cardboard piece
  •  Scissors/ Detail Knife
  •  Marker
  •  Hot glue gun
  •  Tea-light candle 
  •  Zip-lock cover  


Drop pistachio shells in a zip-lock cover and shake it along with Fevicryl Pearl metallic gold color and a few drops of water, until all pistachio shells are covered with color (Instead you can also spray paint the pistachio shells). Spread the painted shells on a sheet to dry out color for about an hour.


Meanwhile, trace out one bigger circle (of diameter approximately 10 cm or more/less depending on the size of votive you wish to make) and one smaller circle (of diameter equal to that of tea-light candle) on cardboard using marker. Use detail knife/scissors to cut along the traced circles. Fix tea-light candle in the circular space formed in such a way that only 0.5cm of tea-light candle is above cardboard base.


Using hot-glue gun, stick colored shells one by one around tea-light candle at around 45 degree angle for effective detailing. Place the shells of next layer in between two shells of before layer. In this fashion, stick the shells until the cardboard is filled. (Tip: Stick the narrow ones first as the gap between two shells increases as we move on to next layers, that's where wider ones comes to the rescue in filling those gaps)

Beautiful pistachio shells candle votive is ready!!!


Thank you for visiting my blog.